FAST TRACK GUIDE: (overview)
For access to detailed step by step instructions ( including video )
click on the
 button located on your members Home page.
Everyone's needs will vary somewhat when building a website from a
template. Your site may required detailed modifications, ecommerce, a
customized look and feel, or the inclusion of a few dozen pages. Or you
may have found just what you need in this template, aside from your own
content, and a a few pages. The FAST TRACK GUIDE is designed to take you
from OPENING to PUBLISHING in the shortest time possible. Aside from
adding your own content, you will need to make some updates to the
included components prior to publishing your template. We're going to
take you through those changes, and work through them in a time saving
manner. The UPDATES are grouped into 2 sets of instructions.
- REQUIRED UPDATED ( just what you need )
- OPTIONAL UPDATED ( more than basic, but still quick and easy )
The instructions are short and simple. If you find you need more
information, please refer to the online instructions ( with video ).
NEED TO KNOW: Library (components)
The web pages in this template include ( 8 ) Library components. A
'component' ( example: dropmenu ) is embedded into a page located in the
'Library' folder, and that page, is then embedded into your template
pages. A Library component allows you to updated a 'component' such as a
'menu bar' from a single location, and that update will 'cascade' to all
the web pages using that component. As an example, if you have 30 web
pages all using the same Library component, you only need to update the
component once, to update all 30 pages. Great time saver. You don't
really need to grasp the concept as to how a Library component works, I
do want you to know that you will be working with the Library pages, and
that you can make site wide updates effectively.
The index page, includes additional 'flash' components which will
require updating.
Here's the list of "required" and "optional"
Library and Flash components you'll be updating in this guide.
|
Required Library components
- logo
- dropmenu
- slidemenu
- copyright / links
- search
|
Required Flash components
- image display
|
Optional Library components
- themed image
|
Optional Flash components
- zoom menu
- flash buttons
|
PREPARATIONS:
Before you begin, I would ask that you complete 3 tasks:
- secure your domain name, and web hosting
- organize the content for your web pages
- create a sitemap / storyboard (create a list of pages you will
want for your site)
FAST TRACK GUIDE: Step 1 (logo)
- log into your members page at
www.luckymarble.com/members
and click on the
 button next to your product license
- click on the a 'Initiate Request' button:

- you will recieve notification in 1-3 business days, at which
time you can log into your members page, and download the new logo
from the "My Customization Requests" section of your home page.
Replace logo with your own image (best to use a transparent PNG
image)
- expand the {Site / logo} folder
- import your replacement image into this folder
- expand the Library folder
- open the {logo} page
- delete the existing logo image
- drag the new image onto the page
- save to update
FAST TRACK GUIDE: Step 2 (remove un-needed ages)
- delete the pages you will not be using
- select a page with your mouse, right click, select delete
- only delete pages in the 'root' of the web
- keep the following** ( $__GETTING_STARTED.htm / contact.htm /
index.htm / privacy.htm / sitemap.htm )
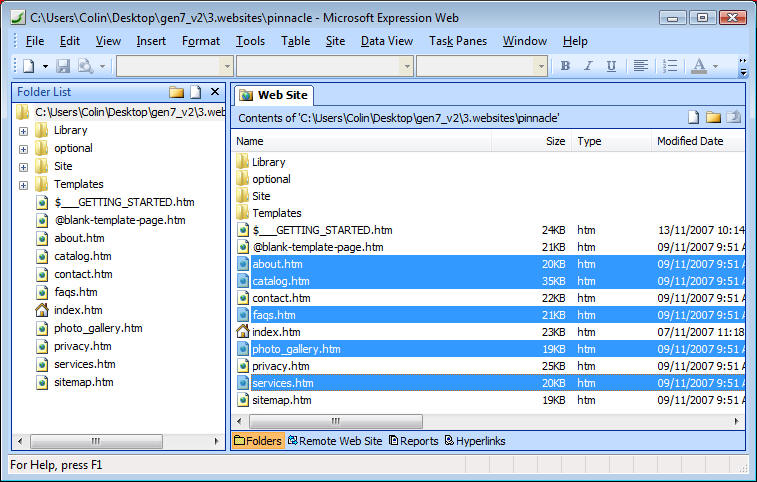
** keep 5 of the includes pages. Delete this page when your site is
complete. Keep the @blank-template-page.htm as you will be using this
page to create your new pages. Keep the contact.htm, privacy.htm and
sitemap.htm as all 3 of these pages are important additions to building
visitor confidence and search engine optimization. Your web 'MUST' have
one of the following pages ( index.htm / index.html / default.htm
or default.html ) this is required by your server. This is the landing
page for your visitors, the first page displayed in the browser when
someone accesses the site by the domain or address (
www.i3dthemes.com actaully takes
visitors to
www.i3dthemes.com/index.htm ).
FAST TRACK GUIDE: Step 3 (add new pages)
- referring to the 'sitemap' created in the 'preparation' stage,
we will now create the additional pages for our site.
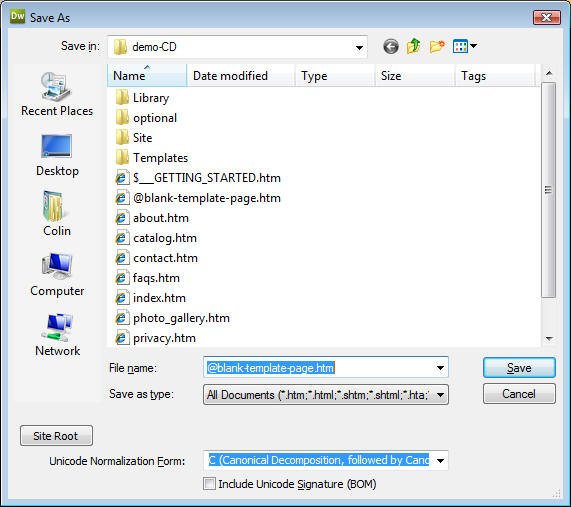
- to create your 1st new page, double click on the
(@blank-template-page.htm) page to open in the design window.
- click on the File Menu >> Select Save as >>
- in the File name: field, the existing page name will be
highlighted in blue, type in a new page name
- click Save
- your new page will be added to the site and open in the design
window
- the 'original' (@blank-template-page.htm) will be closed
- with your new page still open in the design window, switch to
code view and change the " Untitled 1" title meta tag
<title>Untitled 1</title>
- open the (@blank-template-page.htm) and repeat these steps for
each new page in your site
** NOTE ** if saving a page to a sub folder, first save it to the
root, then move it into the sub folder. Once you've moved a page into a
sub folder, open the page, switch to code view, scroll to line #32 and
change the
var rootFlashLocation = "./"; // read the instructions located on
lines 29-31 in code view
| Save As as seen in FrontPage or Expression Web |
Save As as seen in Dreamweaver |
 |
 |
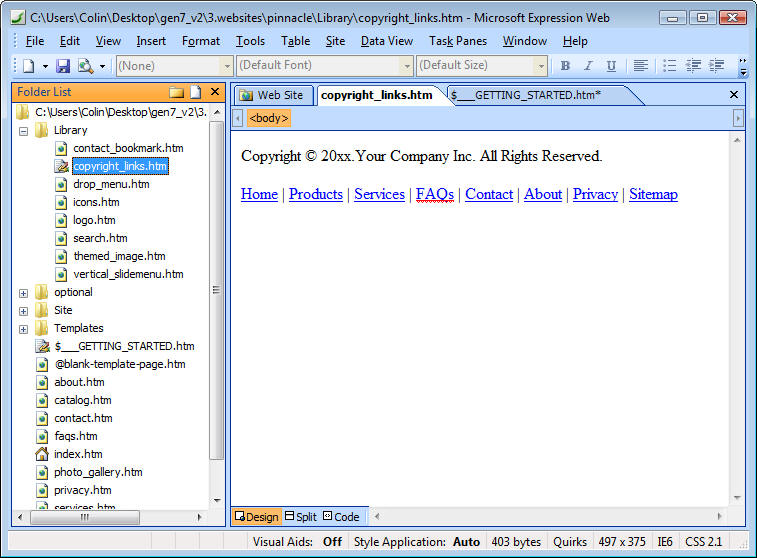
FAST TRACK GUIDE: Step 4 (copyright and bottom text links)
- expand the Library folder
- open the {copyright_links} page
- edit the copy right information
- modify the text links*
- when complete, click SAVE then close the page
* the text links are standard HTML text, with a hyperlink. To learn
more about hyper linking text, use the following tools in your web editor
- FrontPage / Expression Web - in the top right
corner of the program you will find the search 'HELP': Type
a question for help

- type in:
How to Create or Modify a Hyperlink >> then select the (
How to Create or Modify a Hyperlink ) link to review
- Dreamweaver - Press F1 on your keyboard, or
click on the "Help menu >> Dreamweaver Help" to open the 'Adobe or
Macromedia Help Viewer'. The Help Viewer will display an index of
help topics. Select "Linking and Navigation" from the list, then
select "Linking and Navigation >> Linking >> Link to documents using
the Point-To-File icon. Or try one of the other subjects under
LInking and Navigation.
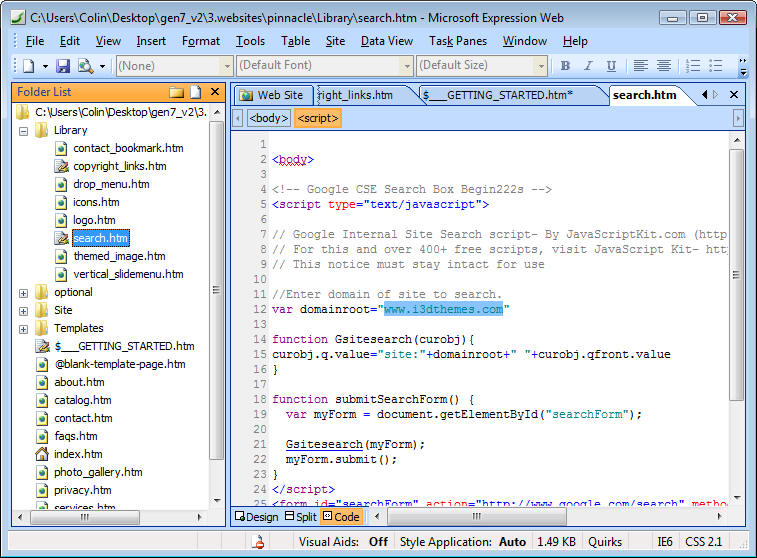
FAST TRACK GUIDE: Step 5 (search form)
- open the {search} page in the Library
- switch to code view
- on line #12 change the default web address "www.i3dthemes.com"
to your own, keep the opening and closing quotes " " in place
- click SAVE then close the page
FAST TRACK GUIDE: Step 5 (dropmenu)
** Designer Notes ** The dropmenu allows the horizontal menu buttons,
to include sub menus or dropmenu's. The sub menu's are optional, and the
horizontal buttons can include a sub menu as well as work as a normal
button with a clickable link. There is a good deal going on behind the
scene's and the 'software' that makes the menu work is all tucked away
in the javascript folder. Admittedly, there is more work involved with
updating a menu of this nature. Learn how, and I hope you'll find the
long term rewards far out weight the short term learning curve. As your
site grows you may want to add more and more pages. Having the tools in
place to allow for this growth will save you from sourcing out flexible
navigation in the months or years to come.
By removing the pages you won't be using and creating your new pages
in the 2nd and 3rd steps, you will have a clear picture of what you will
need to add and remove from the navigation and menu components. As the
dropmenu and the vertical slide menu both allow for 'sub menu's' you can
'categorize or 'group' similar pages together. This will help control
'clutter' on your web pages, and help your visitors quickly find the web
pages they are looking for.
** Preparation ** before starting your updates, grab a piece of paper
and write down what pages you would want to be displayed as a 'menu
group' and what pages required their own button. You may need to create
a menu button for 'miscellaneous' or 'various' pages, depending on how
many pages you'll have in your site. I would suggest no more than 8
horizontal buttons, if more, you may need to remove the 'search form'
from the ( Templates / template.dwt ) master page, to allow the buttons
to expand. ( varies with each template series )
For the following exercises:
- expand the Library folder
- open the {dropmenu} page
- switch to code view
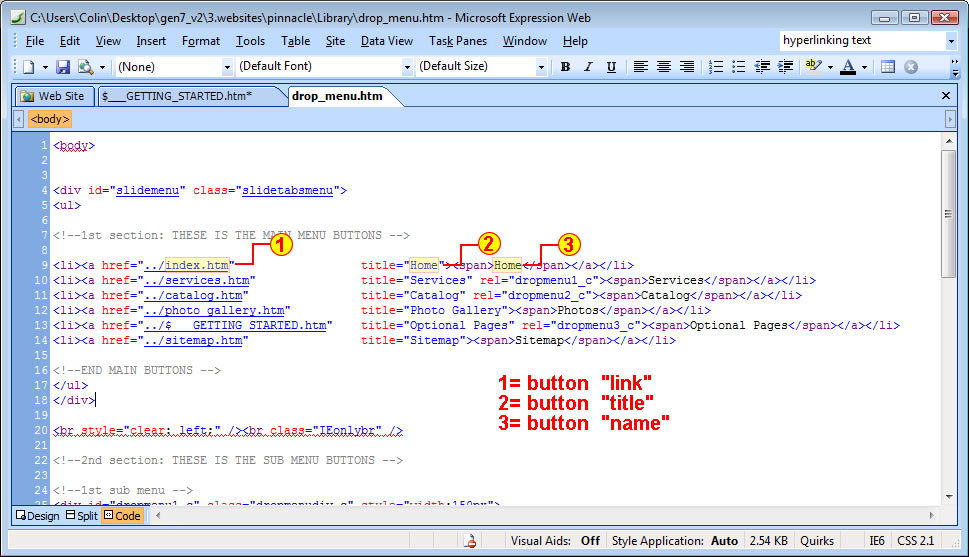
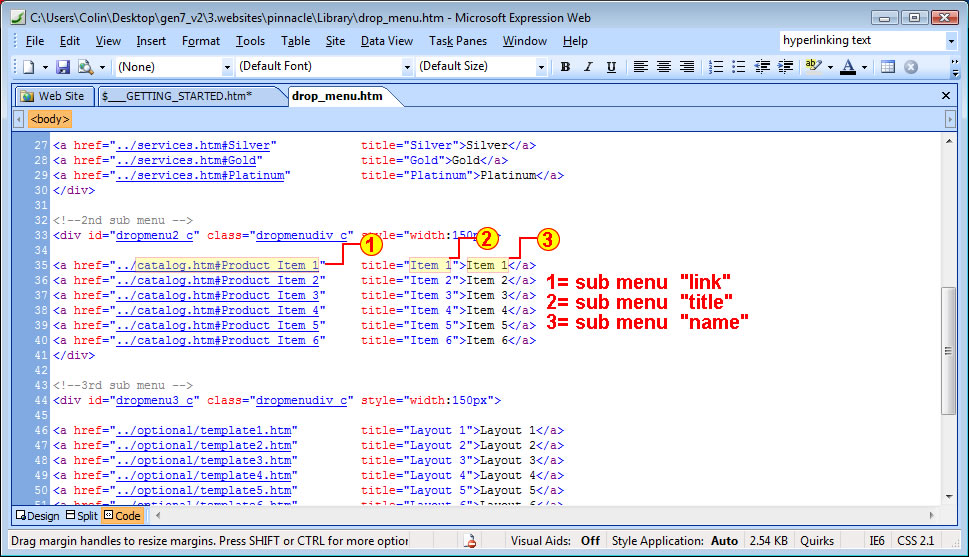
Update a button link / title / name:
- referring to the screenshots below, you can change the button
link, title and name directly in the code view window.
screenshot of main buttons
screenshot of sub menu buttons
Remove a button / sub menu
-
select the line of code for that button / sub menu
and press delete on your keyboard
Add a sub menu
-
to add a sub menu, select a line of code for an
existing sub menu and 'COPY'
-
create a blank space and 'PASTE' the copied code,
then edit
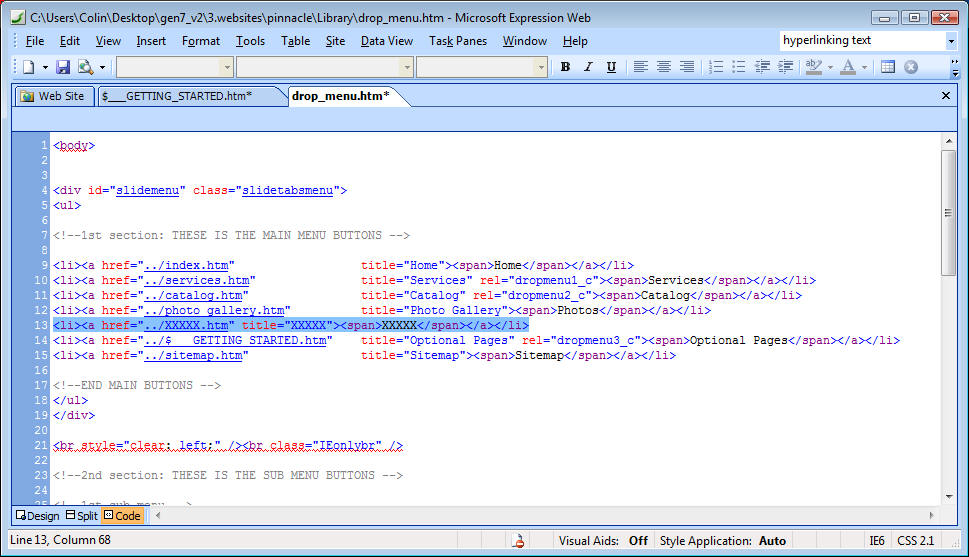
Add a main button
-
add a button with NO sub menu, copy the code below
and paste into the "1st section:"
<li><a href="../XXXXX.htm" title="XXXXX"><span>XXXXX</span></a></li>
-
replace the XXXX in the copied code
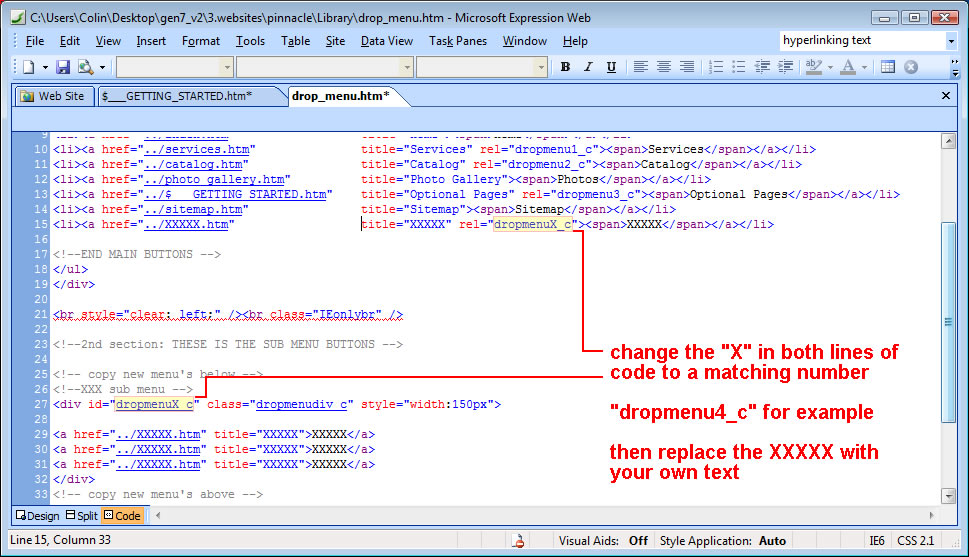
Add a button with sub menu
-
copy the code below and paste into the "1st
section" at the top of the page
<li><a href="../XXXXX.htm" title="XXXXX" rel="dropmenuX_c"><span>XXXXX</span></a></li>
-
copy this next block of code, and paste into the
bottom of the "2nd section:" between: "<!-- copy new menu's below
--> and <!-- copy new menu's above -->"
<!--XXX sub menu -->
<div id="dropmenuX_c" class="dropmenudiv_c" style="width:150px">
<a href="../XXXXX.htm" title="XXXXX">XXXXX</a>
<a href="../XXXXX.htm" title="XXXXX">XXXXX</a>
<a href="../XXXXX.htm" title="XXXXX">XXXXX</a>
</div>
-
update the code pasted into the "1st section",
replacing the XXXXX with new text
-
update the code pasted into the "2nd section",
replacing the XXXXX with new text
-
***VERY IMPORTANT*** code pasted into both the 1st
and 2nd sections contain an ID tag for the submenu. This ID tag
connects the menu button to the sub menu.
for the main button, the ID is (rel="dropmenuX_c")
for the submenu, the ID is (id="dropmenuX_c")
-
for both the main button, and the sub menu you
need to change the "X" in "dropmenuX" to a number. You can use any
number that is not in use by other buttons and submenu's. I suggest
you start with number 4.
example: change "dropmenuX_c" to "dropmenu4_c" for both the button
and sub menu, for each additional button with sub menu, increase
sequentially.
FAST TRACK GUIDE: Step 6 (vertical slidemenu)
** Designer notes ** The slidemenu is a bit different from the
dropmenu. The slidemenu will allow for a 'button' that uses are regular
'clickable' link, or a 'button' that opens a
submenu. ( but not both ). The slidemenu is a bit easier to update
though, so good news for you. As with the dropmenu, this is a 'long
term' solution to your navigation requirements. You may not 'need' sub
menu's, no problem, the slidemenu will act as a regular menu as well.
Having the ability to display a sub menu may be something you'll need in
time, and if the 'foundation' has already been laid, it will be very
easy to add that functionality when the need calls for it.
For all exersices:
- expand the Library folder
- open the {vertical_slidemenu} page
- switch to code view
The {vertical_slidemenu} uses <div> containers and regular <a href>
links. There is quite a bit going on behind the scenes using javascript
to correctly render the menu, but the make up of the menu is pretty
straight forward. Let's take a look at the vertical_slidemenu page, and
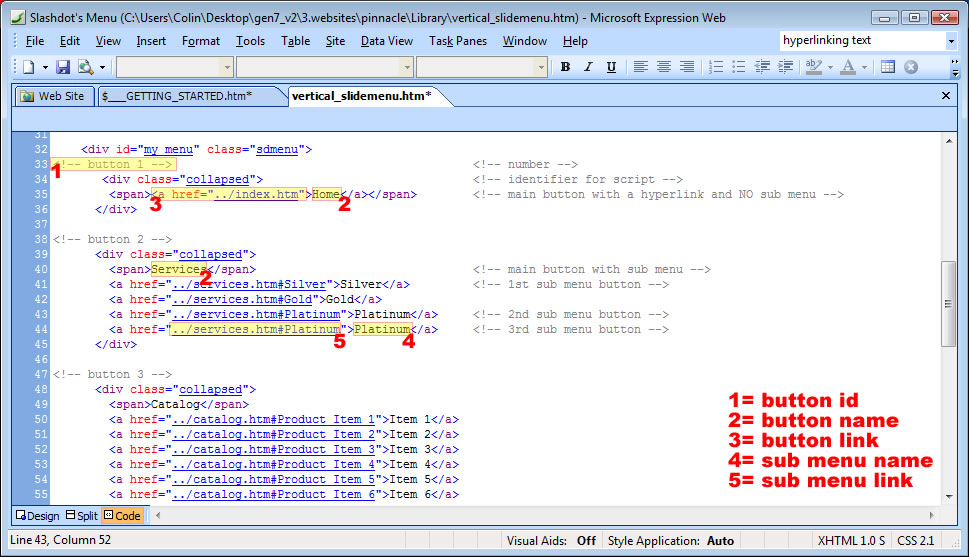
break it down a bit so you can understand what to to.
- each button is displayed in a block of 'code' and each block of
code starts with the button number
example: <!-- button 1 -->, <!-- button 2 -->
- each block of code includes an 'ID' or identifier used by the
javascript. If you remove or edit the ID the menu will not work
example: <div class="collapsed"> (DON'T TOUCH)
- each block of code includes a button name, which is wrapped
inside of the <span> </span> tags
example: <span>Services</span>
if the button includes a sub menu, the button name will be wrapped
inside the <span> </span> tags AND the sub menus will be listed
directly below the button name
example:
<span>Services</span>
<a href="../services.htm#Silver">Silver</a>
<a href="../services.htm#Gold">Gold</a>
if the button DOES NOT include a sub menu, the button will be still
be wrapped inside the <span> </span> tags, AND it will include the
<a href=".../page_name.htm"> on the left of the name, and the
closing </a> on the right,
example: <span><a href="../index.htm">Home</a></span>
Add a button (no sub menus)
- copy the code block below
<!-- button X -->
<div class="collapsed">
<span><a href="../XXXXX.htm">XXXXX</a></span>
</div>
- paste into the vertical_slidemenu page
** note ** paste it between 2 existing blocks of code if you want to
display the buttons in a specific order
- change the XXXXX for the link and the name
Add a button (with sub menus)
- copy the code below
<!-- button XXXXX -->
<div class="collapsed">
<span>XXXXX</span>
<a href="../XXXXX">XXXXX </a>
<a href="../XXXXX ">XXXXX </a>
<a href="../XXXXX ">XXXXX </a>
</div>
- paste into the vertical_slidemenu page
** note ** paste it between 2 existing blocks of code if you want to
display the buttons in a specific order
- change the XXXXX for the button name, sub menu names and links
Change a button name
- names are displayed in black 'text' (screenshot numbers
#2 and #4)
- replace the black text with your own to change the button name,
or sub menu name
Change a button link
- hyperlinks are displayed in 'blue' and start with the <a href="
">
- change the "page_name.htm" to a new page name, keep the ../ and
the opening and closing " "
Change a main button with sub menu to a clickable main button with
link
- delete all the "<a href...</a>" sub menus below the <span>
button name </span>
- copy the code below
<span><a href="../XXXXX.htm">XXXXX</a></span>
- delete the existing button name
- paste the copied code
- change the "XXXXX" 'link' and the "XXXXX" 'name'
Change a clickable main button to a main button with sub menu
- delete the existing 'block' of button code
- copy the code below
<!-- button XXXXX -->
<div class="collapsed">
<span>XXXXX</span>
<a href="../XXXXX">XXXXX </a>
<a href="../XXXXX ">XXXXX </a>
<a href="../XXXXX ">XXXXX </a>
</div>
- paste into the empty space
- change the XXXXX for the button name, sub menu names and links
FAST TRACK GUIDE: Step 6 (flash image display)
** Designer notes** the flash image display is a cross between a
photo gallery, and a large editable banner add. Designed to blend in
with the flash header / flash intro. Modify the 'Title' and
'Description' for each image, and you have an instant add window, for
your own 'brand', products, services or what ever you would like to
shine the spotlight on. The display window doubles as a gallery, put
images of your own adventures, people, places etc and you have an
instant gallery. No matter what your purpose, you have the ability to
display as many images and messages as you like.
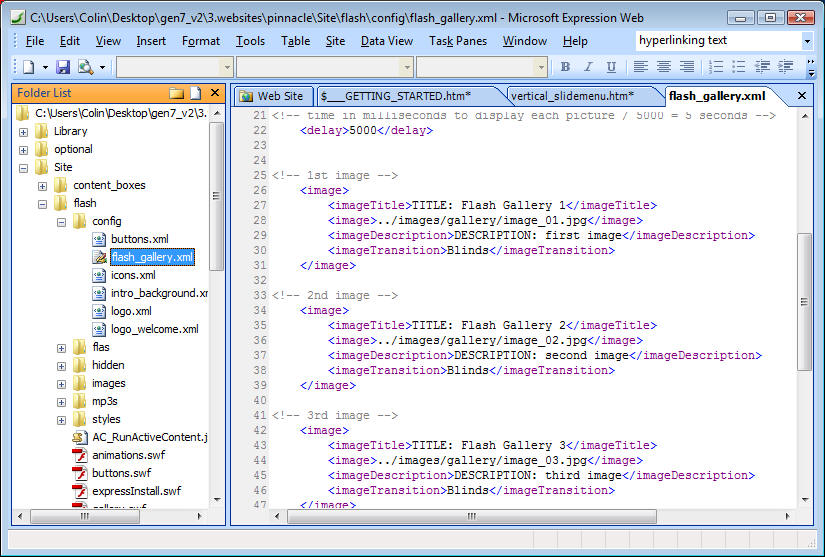
- expand the {Site / flash / config} folder
- open the {flash_gallery.xml} page
Change the Titles and Descriptions
- Title: update the black text between the <imageTitle>TITLE:
Flash Gallery 1</imageTitle> tags
- Description: update the black text between the <imageDescription>DESCRIPTION:
first image</imageDescription> tags
** note ** editable text is displayed in black, change just the black text
Replace the images in the display
- expand the {Site / flash / images / gallery} folder
- drag and drop, or import your replacement images into this
folder
- open the {flash_gallery.xml} file
- replace the <image> name
example: <image>../images/gallery/image_01.jpg</image>
replace the "images_01.jpg" file name to your new file name
Remove an image
- delete the 'code block' starting with <image> to </image>
Add an image
- copy the following code, and paste between an existing block, or
at the bottom
<!-- XXX image -->
<image>
<imageTitle>XXXXX XXXXX</imageTitle>
<image>../images/gallery/XXXXX.jpg</image>
<imageDescription>XXXXX XXXXX</imageDescription>
<imageTransition>Blinds</imageTransition>
</image>
- replace all instances of XXXXX with your own title, description,
picture name
FAST TRACK GUIDE: Step 7 (content and publish)
** Designer notes ** with the 'foundation for your website complete,
just add content and publish. The FAST TRACK GUIDE does not cover
editing the content on the existing pages, such as the photo-gallery, or
the catalog page. The instructions are online. I did not include the
instructions in this guide, as many of you will be removing these pages,
at least for now. I did not want to include instructions in the FAST
TRACK GUIDE that were not relevant to our members in general. Knowing
you would be removing many of these pages, the instructions on how to
change the menu's and navigation components was included...pretty good
chance that you'll be removing a few icons from the ZOOOM menu.
Add the content to your pages
- each template page contains at least 3 areas for 'SEO text' (
search engine optimization = designed to help you with your search
engine rankings )
- Optimized key words for Page Title
- Optimized key words and phrases for page description
- Heading
- the Page Title should closely match the <title> meta tag
- the page description should include key words or phrases ( terms
you think your visitors would use to search for the type on content
that is on this page )
- the heading describes the type of information on the page
- you can use these areas for anything you like, but they can
really help with your search engine optimization efforts
- add content to the pages in the manner you are most comfortable
with
- when complete, publish the site for a test run
FAST TRACK GUIDE: Optional 1 (themed image)
** Designer notes ** the themed image is a transparent PNG image. you
can replace the included image with any image that will display in a web
browser, however I recommend you use a transparent PNG image, using the
same relative size as the original to obtain the best results.
Replace the themed image
- expaned the {Library} folder
- open the {themed_image} page
- delete the existing image
- import your new image into the {Site / themed_image} folder ( or
any folder that suits you )
- drag the new image from your folder, onto the {themed_image}
page
- save to update
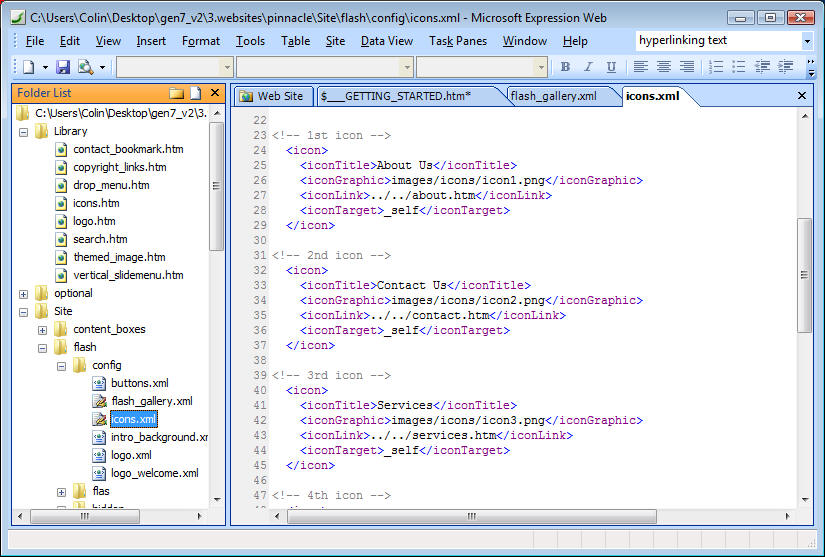
FAST TRACK GUIDE: Optional 2 (flash ZOOOM menu)
** Designer notes ** You can add or remove icons from the flash zoom
menu, no need for flash! To keep things moving along, let's focus on
renaming / linking and removing icons in this exercise. To learn how to
add icons, review the online instructions and video.
For all exersices:
- expand the {Site / flash / config} folder
- open the {icons.xml} page
Rename and icon
- replace the black text between the <iconTitle> and </iconTitle>
tags
Change the link
- change the black "hyperlink" text between the <iconLink> and </iconLink>
tags
** note do not remove the "../../" just change the "page_name.htm"
Remove an Icon button
- select the 'block' of code from <icon> to </icon>, and delete
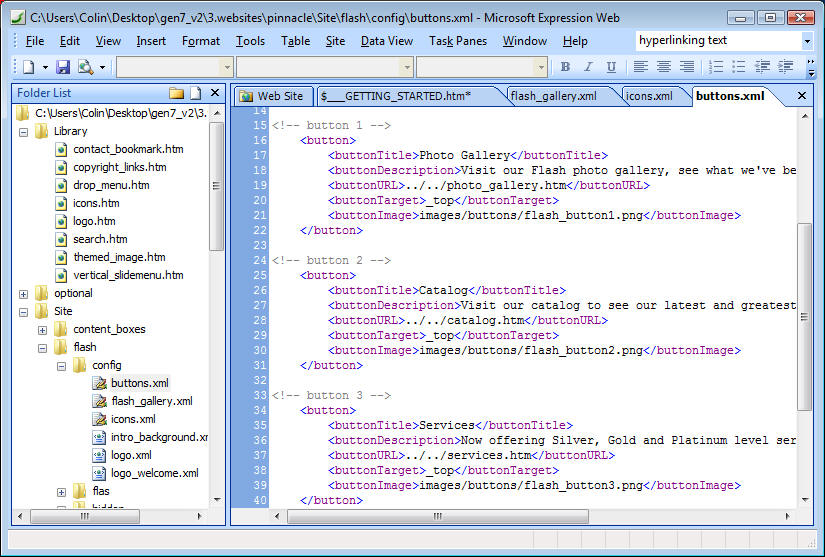
FAST TRACK GUIDE: Optional 3 (flash buttons)
** Designer notes ** the flash buttons include several features you
can change. For the full story, review the online instructions. For this
exercise we'll rename the button title, the description and change the
button link.
For all exersices:
- expand the {Site / flash / config} folder
- open the {buttons.xml} page
Change a button title
- edit the black text between the <buttonTitle> and </buttonTitle>
tags
Change a button description
- change the black text between teh <buttonDescription> and
</buttonDescription> tags
Change a button link
- change the hyperlink between the <buttonURL> and the </buttonURL>
tags
Conclusion:
With the basic changes outlined in the FAST TRACK GUIDE you should be
able to produce a website with a new logo, new pages, working navigation
and menu's in a relatively short period of time. Everyone learns at a
different pace, and I'm sure many of you have the experience to open the
Library and XML pages and complete the required changes without any
additional instructions from us. I'm also sure there are a few of you
who may have felt this was over your current experience level.
Please keep these few thoughts in mind.
**For the folks that found it easy, they have already invested dozens
of hours learning how to work with web sites and the bits and pieces
that go inside. Or just naturally gifted with computers.
**For the folks that found it a bit beyond what they were expecting,
I won't tell you this was actually an easy template to work with (just
because I'm on the design team)... but what I will tell you is you have
a very advanced web template, that uses many advanced components - try
to compared the value of what's in the template package to the amount of
time you may spend looking for these types of web features, or the cost
of hiring a web designer.
I've presented the FAST TRACK GUIDE as a tool to help you build your
website quickly and efficiently. This guide does not allow for the many
many customizations or additional modifications that you may want for
your website. To that end, we've posted detailed instructions online,
many of these with video and commentary.
Thank you.
|